A new coat of paint can look excellent on day one and still fail far sooner than it should. Along Florida’s Gulf Coast, heat, humidity, salt air, wind-driven rain, and mildew all put pressure on painted surfaces. This complete surface preparation guide explains what needs to happen before paint or stain is applied, and why careful prep is the foundation of a finish that lasts.
For homeowners in Venice, Sarasota, Bradenton, North Port, and nearby communities, preparation is not an optional extra. It is the work that helps a coating grip the surface, resist moisture, and maintain its color through intense UV exposure and seasonal storms.
Why Surface Preparation Matters More in Florida
Paint is only as durable as the material beneath it. If a wall has chalking paint, loose coatings, mildew, or moisture damage, a premium exterior paint cannot correct those conditions by itself. It may cover the problem temporarily, but peeling, bubbling, or early fading can follow.
Florida homes face a distinct combination of challenges. Exterior stucco can develop hairline cracks and chalking. Wood trim and fascia can hold moisture after rain. Screened lanais, decks, and soffits may collect mildew in shaded areas. Coastal properties can also accumulate salt residue that interferes with adhesion. Indoors, bathrooms, kitchens, and high-traffic areas can show nail pops, drywall dents, grease, and old patchwork.
Thorough preparation addresses these issues before they become visible through a fresh finish. It also allows the painting team to identify whether a surface needs cleaning, repair, primer, caulk, or a different coating system altogether.
Complete Surface Preparation Guide: The Core Process
The right approach depends on the surface and its condition. A recently painted interior wall needs far less work than weathered exterior wood or a stucco home with failing paint. Still, a professional process follows the same basic principle: inspect first, correct defects, create a clean and stable surface, then apply the appropriate primer and finish.
Start With a Close Inspection
A proper inspection looks beyond faded color. The goal is to find the source of any failure before covering it. On an exterior, that can mean checking for cracked caulk around windows, soft wood, rust stains, loose paint, mildew, damaged stucco, and drainage issues. On a deck, the condition of the boards, fasteners, and existing stain matters just as much as the color.
Inside, the inspection should include drywall seams, water stains, nail holes, dents, previous repairs, and glossy surfaces such as trim, doors, and cabinets. A water stain may need a stain-blocking primer, but it should also prompt a check for an active leak. Painting over active moisture is rarely a lasting fix.
Clean Away Contaminants
Cleaning is one of the most overlooked parts of painting preparation. Dirt, chalk, pollen, grease, mildew, and salt can all create a barrier between the coating and the surface.
Exterior cleaning may involve pressure washing with the correct technique and cleaning solution. Pressure that is too aggressive can scar wood, force water behind siding, damage window seals, or etch softer materials. The objective is to remove surface contamination without creating new problems. After washing, the area needs adequate time to dry, particularly during humid weather.
Interior walls are usually cleaned with a mild solution to remove dust and household residue. Kitchen cabinets require special attention because cooking oils can remain even when a surface looks clean. Cabinets should be thoroughly degreased before sanding or priming, or the new coating may not bond properly.
Remove Failing Paint and Sand for Adhesion
Loose, blistered, flaking, or peeling paint must be removed. Applying a new coat over an unstable layer simply transfers the failure to the new finish. Scraping removes loose edges, while sanding feathers the remaining paint into the surrounding surface so repairs are less noticeable.
Sanding also gives glossy surfaces enough texture for primer and paint to adhere. This is particularly important for cabinets, trim, doors, metal railings, and previously coated wood. The purpose is not to sand every surface down to bare material unless the condition requires it. It is to create a clean, sound, properly profiled base.
Lead-safe practices should be considered when disturbing older paint, especially in homes built before 1978. A qualified professional can determine the safest preparation method for the project.
Repair Cracks, Holes, and Damaged Materials
Paint improves appearance, but it does not repair structural or surface damage. Small stucco cracks should be addressed with compatible patching materials or elastomeric caulk when appropriate. Larger cracks, recurring movement, or signs of water intrusion may require further evaluation before painting begins.
For interiors, drywall repairs can include filling nail holes, patching dents, repairing cracks, replacing damaged sections, and smoothing uneven texture. Each repair needs to dry, be sanded smooth, and be primed as needed. Rushing this stage can leave patches flashing through the final paint, especially under natural light.
Exterior wood needs careful evaluation. Minor checks and cracks may be repairable, while rotted fascia, trim, or deck boards should be replaced rather than painted over. Caulk is effective for narrow joints and gaps, but it is not a substitute for sound building materials.
Caulk Open Joints Where It Makes Sense
Quality caulking helps keep water out of vulnerable joints around trim, windows, doors, and exterior penetrations. It also gives the finished project a cleaner, more complete appearance. In Florida, flexible exterior caulk is especially valuable because materials expand and contract under heat and changing moisture levels.
Not every gap should be caulked. Areas designed for ventilation or drainage need to remain open. Caulking those spaces can trap moisture and create a larger problem behind the paint. This is one reason experienced preparation matters: the right material in the wrong location can still cause damage.
Prime Bare, Stained, or Problem Surfaces
Primer is not automatically necessary on every square foot, but it is essential where the surface calls for it. Bare wood, exposed metal, patched drywall, repaired stucco, water stains, and areas where old paint has been sanded away often need primer before topcoats are applied.
The primer should match the material and the problem being solved. For example, stain-blocking primers help keep water marks and tannins from bleeding through. Bonding primers improve adhesion on slick cabinets or glossy trim. Rust-inhibiting primers are used on prepared metal. Masonry and stucco may require a compatible primer that manages porosity and supports the selected exterior coating.
Using the correct system can feel like an added step, but it helps prevent uneven sheen, color variation, bleed-through, and premature paint failure.
Surface-Specific Preparation Considerations
Stucco and Exterior Masonry
Stucco should be clean, dry, and free of chalking before coating. Hairline cracks may be filled, while larger cracks need a closer look. The chosen paint system should be suitable for masonry and Florida’s humidity, with enough flexibility to handle normal movement.
Wood Siding, Fascia, and Trim
Wood preparation requires scraping failed paint, sanding rough edges, repairing rot, and sealing exposed areas. End grains, joints, and horizontal surfaces deserve added attention because they are common entry points for moisture. Proper priming is particularly important on bare wood.
Decks and Exterior Wood
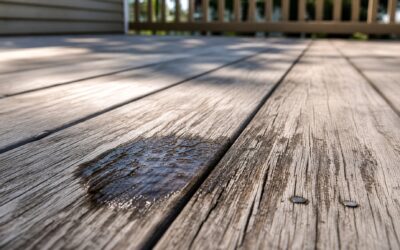
Decks need more than a quick rinse and stain. Old failing coatings, embedded dirt, mildew, and weathered fibers can keep stain from penetrating evenly. Depending on the existing finish and the wood’s condition, the surface may need cleaning, stripping, sanding, brightening, or localized board replacement. A deck also needs sufficient drying time before stain is applied.
Cabinets and Interior Trim
Cabinet painting demands a controlled process. Doors and drawer fronts are removed or carefully prepared, hardware is protected, grease is eliminated, glossy coatings are sanded or deglossed, and a bonding primer is applied. The trade-off is time: careful cabinet prep takes longer than a simple wall repaint, but it is what creates a smooth, durable finish that holds up to daily use.
Timing, Weather, and Drying Time
Preparation work must account for Southwest Florida weather. Washing or repairing exterior surfaces immediately before rain can introduce moisture beneath the coating. Painting in direct heat or on an overly hot surface can affect application and drying. High humidity can extend cure times, even when a surface feels dry to the touch.
A dependable contractor watches the forecast, checks moisture conditions, and plans the work accordingly. There are times when waiting is the responsible choice. Painting over damp wood, wet stucco, or uncured patching compounds may save a day on the schedule but can cost far more in rework later.
What Homeowners Can Expect From a Professional Prep Plan
A clear estimate should explain the condition of the surfaces and the work included before paint is applied. Homeowners should know whether the project involves pressure washing, scraping, sanding, drywall repair, caulking, priming, wood replacement, or mildew treatment. This avoids the frustration of assuming preparation is included when the proposal only covers painting.
At Pro Painting & Associates, preparation is treated as part of the finish, not a shortcut between cleaning and color. With more than 15 years of local experience and 2,700-plus completed projects, the team understands that Florida properties need coating systems built for the conditions they face.
Before choosing a color or scheduling the first coat, take a close look at what the surface is telling you. Peeling edges, dark mildew spots, cracked caulk, soft wood, and recurring stains are not cosmetic details. Addressing them early gives your home the clean appearance and long-term protection a quality paint job is meant to provide.